Webinar Transcript: Widgets
The following is the transcript of our “Getting Creative with Localist Widgets” live webinar that was held on August 8, 2018.
This webinar is all about giving you some Widget inspiration so that you can start, or continue, using them in the most effective and creative ways for your organization and audience!
The Basics
For those of you who are new to Localist, or perhaps as a refresher for Localist veterans, Widgets are a Promotion tool. They enable you to create events once in Localist and publish them anywhere you like. Our Public Widget Builder allows anyone, at any time, to generate an embed code based off of your existing Classification -- such as Landing Pages or Filters. By default, the Widget Builder is linked in the “Share Events” box on your Calendar Homepage. Or Admins can access the builder by navigating to Content > Widgets > Public Widget Builder
The Benefits
For such a simple tool, Widgets are quite possibly the most powerful tool available on your platform. Here’s why: Save Time. Widgets will save time -- right off the bat, you can take advantage of out-of-the-box templates and styling options in just a few clicks. Once added to your site, if any details change in Localist, such as the date, the Widget will automatically update to reflect the change with no action needed from you. This is absolutely a “set it and forget it” tool.

Details, Details, Details. Speaking of saving time, there’s nothing more frustrating than receiving bits of information and having to hunt down the rest. With Localist Widgets, your audience will immediately be provided with the top must-know details.

Always Stay on Brand. Localist Widgets are designed to adopt the styles on the page that it lives on, but you also have access to the HTML templates for ultimate design flexibility. In fact, your audience won’t even know it’s technically an embed, instead they’ll see them as a natural piece of your page.

Centralization. Ultimately, Widgets promote centralization. Using Localist to export and embed event content goes beyond design, details, and saving time. You are creating a centralized hub for curating, managing, and promoting event content.

In The Wild
Now that we’ve covered the basics, let’s explore the different ways we’ve seen Widgets implemented in the wild. There are three main ways that we’ve seen Localist Widgets used:
Supplemental Widgets
First we have Supplemental Widgets. As that might suggest, the presence of these widgets is another element in the page’s content mix. The events that are included, and how they’re displayed, will vary depending on the content of the page on which the Widget lives.

Let's explore some different ways supplemental widgets are currently being used: Paired with News and Social Media. News and events are two sides of the same coin so it’s no surprise that they’re often displayed alongside one another. Georgia State University and University of Delaware are both taking advantage of this natural pairing. Since events are inherently social, it’s also an opportune time to make this pair a trifecta and include social media highlights.

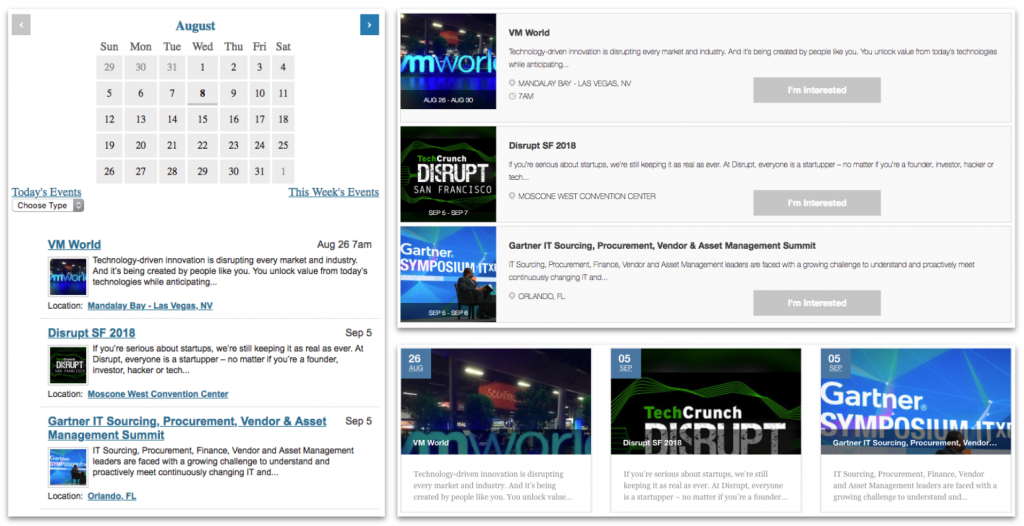
Horizontal Display. If you’re looking for your supplemental widget to stand out on your page a bit more, try a horizontal widget that is the full width of your page. In this example, University of California San Francisco, turned our Classic Widget on its side. Localist’s Card Widget template is also the perfect ready-to-go solution for this display, but not just because it’s already horizontal--it also features large, eye-catching images. SUNY Fredonia is a great example of putting this template to work.

As you’ve seen so far, supplemental isn’t synonymous with mundane. Another exciting way customers make the most of widgets is by using multiple on one page all while requiring minimal real estate. Multiple Widgets. Let's start with the Vineyard Gazette. They’ve decided to use this sidebar for events, but that didn’t stop them from including two widgets: one for the featured events at the top followed by another of upcoming events. Don’t forget, your Widget Builder offers a simple checkbox to pull only Featured or Sponsored events!

Tabbed Widgets. In the same vein, let's take it up a notch and explore what we call “tabbed Widgets.” This entails placing multiple widgets on a page then using HTML and JavaScript to place each Widget behind a tab. This way it only displays when a user interacts with the component. With this strategy, you’ll save on space and it offers cues to your users as to what umbrella the content falls under. Michigan Tech University uses this method to separate and signal the types of events. Beyond event types, the tabbed widgets could be used as an effective way to divide according to date or seasons.

Uniquely Framed. Just because these Widgets are supplemental, doesn’t mean they shouldn’t be uniquely framed. A little header or messaging goes a long way! Richmond Culture Works opted for a bold call-to-action in lieu of an “Events” header, while the University of California Irvine chose to include a blurb that highlights the kinds of events you can expect to find happening on their campus.
Consistent Widgets
Next up we have Consistent Widgets. We call them consistent because well, they are! These are Widgets that are included as a consistent element in the sidebar or footer of your website. No matter what page you navigate to, the Widget will always be displayed in the same location.

Sidebar Display. Here we have Coachella Valley, which features a general Upcoming events Widget in the right sidebar of their “What’s New?” page. Depending on your content strategy, events in sidebars like this may or may not vary per-page.

In the Footer. In comparison, Colgate University baked a Widget directly into their universal footer. This means that any page that uses their universal template will automatically feature these events.

Full Page Widgets
Now, we have Full Page Widgets. This is the case when the Widget is the main purpose and function of the containing page. Without the Widget on this page, it would be empty or wouldn’t make sense to your users. Full-page Widgets enable flexibility in space and design without competing with other content. As a result, they make fantastic events pages for groups and organizations related to your own.

Keeping it Classic. Let's start by taking the name “Full Page” Widget right in stride. First up, we have Mount Sinai Hospital’s Icahn (icon) School of Medicine. They gave the Widget their own aesthetic touch, but nonetheless--this page is just our standard Mini Cal + Classic List Widget template.

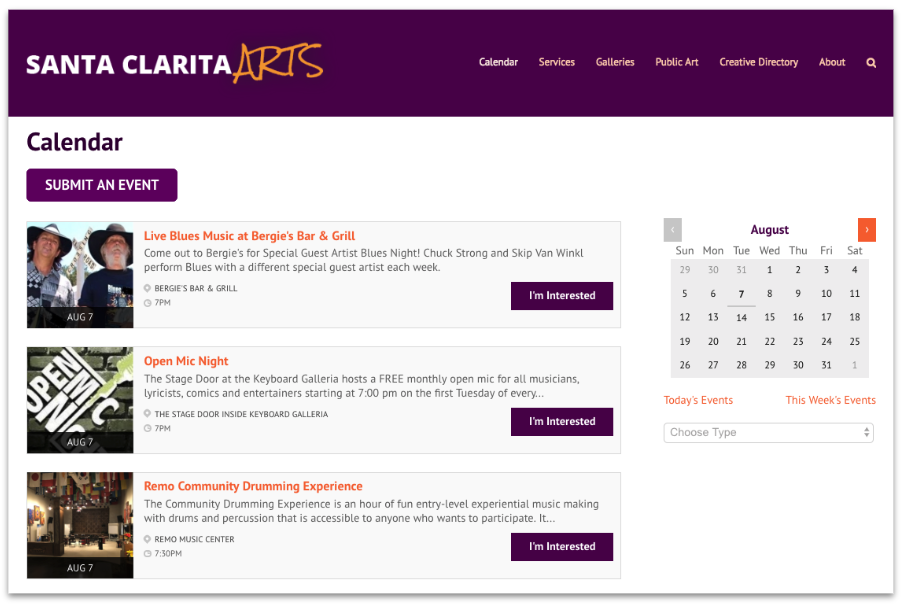
Modern. Similarly, Santa Clarita Arts has also used the Combo Widget template, but this one utilizes the Modern list style. This is a great way to give subsets of your organization the look and feel of a full calendar without sacrificing the benefits of centralizing your events in Localist.

Tabbed. Let's take a quick step back--remember those tabbed Widgets? Now just picture them bigger-- as in the size of an entire page! Georgia State University combines the tabbed method for date signaling with a full page layout. This is a great option especially if your Widget needs to display a long list.

Widgets on Widgets. However, combining Widgets together with tabs isn’t the only way! How about embedding multiple widgets across your page--no tabs necessary. As you can see, University of Tulsa takes a multiple Widget approach to dividing dates, but they chose to keep every Widget visible upon page load.

Customizations
Now that we’ve reviewed some common displays, don’t forget that the template editor isn’t just for customizing the overall Widget. It can also be used for adding specific customizations to the event listings themselves. In fact, the following customizations we have to show could very well be the only change made to an out-of-the-box template!
Additional Details
First up, let's talk about adding more details to the listings. A popular addition we’ve seen is adding the cost or a call-to-action for registration. This ensures folks are aware of the additional step required to attend, especially when your organization doesn’t often host paid events. University of the Pacific opted to add two CTAs to the event listings in their widget. The Register button redirects the user to the website in which they can register for the event. And the More Info button will redirect the users to the event landing page in Localist so they can peruse the event’s full details.

Another simple addition we’ve seen is including a filter set, such as Event Types or the event’s Target Audience. This is helpful when your widget includes a variety of events or isn’t on a more granular page.
Image Size
On top of adding more details, customizing the look of your widget doesn’t need to entail starting from scratch or advanced technical knowledge. One of the easiest changes you can make is adjusting the image size. This only requires swapping out sizes in the template and is currently outlined in our Photo Customizations article available at support.localist.com/photo-customizations. In Allegheny College’s custom Widget, not only did they opt to change the photo size to be larger, they also added a border radius to give the event photos a nice round shape.

Reordering
If your website style guide calls for a different ordering of event content, the templates have got you covered! Just swap out blocks of code to come before or after another. Originally, the Mini Cal + List Widget has the Mini Cal above the event listings. In Visit Lorain’s Widget, they floated the mini cal to the right and placed the event listings in a scrollable box to the left. But changing the order of your event content doesn’t have to be a big change! For instance, The University of Tennessee Knoxville went with a more subtle change by moving the event dates above the title in this Widget.

Other Use Cases
While those ideas cover more traditional use-cases, they don’t stop there! Here’s are a few more final ways you can maximize your Widgets. Print View. If you need a way to publish a list of events that is optimized for printing, a simple widget will do the trick. Just remove things like images and descriptions then link to the widget’s preview page like Tarrant County College has done here.

Added to Your Platform. Since Widgets are curated to be placed on other websites, why not use a Widget directly on your actual calendar platform! For a unique display of your events in a Channel, simply curate your Widget, generate your embed code, and then add it to an HTML Component in your Channel Layout Editor. Or how about embedding a Widget of Featured Events across all event landing pages to give those events an even bigger boost.
 Custom RSS. You can build a customized RSS feed based on the criteria set in your Widget builder! To do this, build your Widget as usual in the Widget Builder, but instead of selecting Generate Embed Code, select Preview Widget. In the URL of this page, change the URL from format=html to format=rss. Bada bing bada boom, you have a custom RSS feed! If you have the technical chops, you can even use a Widget template to write RSS code so your feed outputs as many unique details as desired.
Takeaways
If there’s one thing you should take away today, it’s that Widgets can be powerful ambassadors for your calendar. Using Widgets drives your audience directly back to your main platform where users can see additional details and learn about other events, as well as maintain a consistent brand, voice, and workflow while promoting your events. Keep in mind that the ideas and customizations we’ve covered today are meant to get you thinking creatively and strategically about how you already or plan on implementing widgets. The important part is that your event content is being dispersed across your website -- customizations or no customizations!
Questions
The following are questions that were asked by Localist customers during the live webinar:
Q: So I see the Build Widget on the homepage, does that mean anyone can build a Widget?
A: Yes, the Public Widget Builder is accessible to all! By default the Share Events box on your homepage include a link to your public widget builder -- of course, you can always remove the Share Events component from your Channel or hide it with CSS, which means only admins can create them by navigating to Content then Widgets in their admin dashboards.
Q: Are tags and keywords the only feature used to create widgets, or what else can I use to pull content into a widget?
A: Like Channels, Widgets are a Promotion tool. You’re able to use Date Ranges and all Classification -- including Filters, Landing Pages for Places, Groups, or Departments, as well as Tag & Keywords to populate your Widget. As I mentioned before you can also opt to only included events marked as Featured or Sponsored.
Q: Is there a limit to how many I can make? A: The limit does not exist! You can have as many Widgets as your org or audience desires.
Q: How long does it take for widgets to update? A: You can expect widgets to be fully updated within 10 minutes or so of the details being changed.
Q: Can you have past events in a widget?
A: By default past events are automatically removed from widgets once the day they occur is over. If you’d like to prevent past events from leaving a widget then you can tack on a start parameter to the widget URL. That said, this will freeze the list of events to that date range.
Q: Can I have events only display on a widget and not the main calendar?
A: Sure can! By default events created in Localist are visible to the Public, however, you have the option to mark your event as Restricted to Widgets only.
Q: How can I tell how much traffic is coming from a widget?
A: In Google Analytics you can look at the utm parameter to determine how a visitor made their way to a specific event or your platform. If you’d like to use a specific parameter, you can also tack it onto the widget URL in the embed code.