Classroom Transcript: Submission Guidelines
The following is the transcript of our “Submission Guidelines” How-to video.
The Localist Event Submission form was designed to be a no-brainer for your audience. But what if you have unique messaging you want to share with your audience? During this Localist Lesson we’ll be showing you how your submission form can showcase these details with Custom Guidelines.
What Are They?
Custom Guidelines are simply text placed strategically on or around the form to communicate details like:
- Who should be submitting events TOP
- What criteria the events must meet to be on your calendar MIDDLE
- The turnaround time on event approval BOTTOM
- Light instructions or tips, etc. SIDE
There are 4 main pieces of the Public Event Submission Form we are going to focus on today:
- The right side bar
- Above the form
- Below the form
- Within the form
Theme Editor
To get started:
- Login to your Localist Admin Dashboard
- In the left side navigation select, Settings > Platform Settings > Appearance
- On the Appearance page, select the Edit HTML (code icon in screenshot below) for your active theme.
- This will take you to the Theme Editor where you will find all of the HTML files for your platform.
- Scroll down the list of files until you see the header “Events.”
- We’ll be working in the Public Event Submission Form and _edit_sidebar files.

Right Sidebar
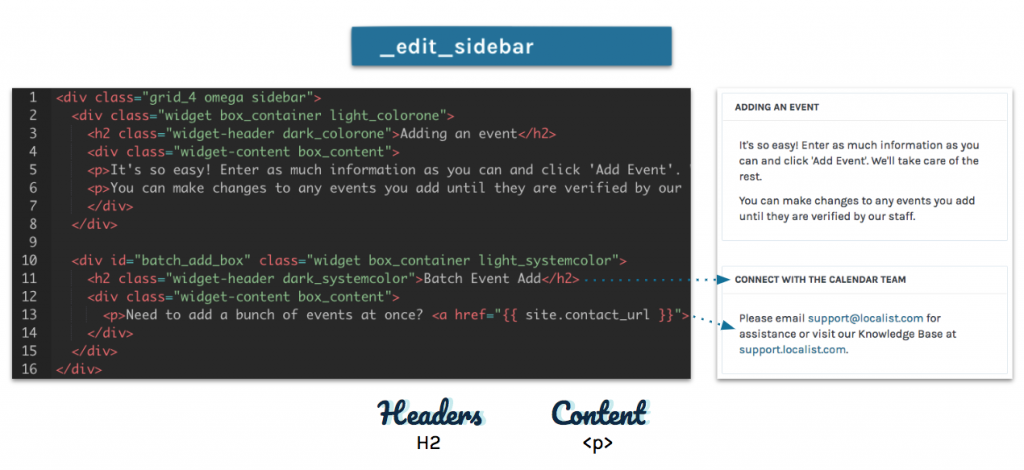
This file powers the content located to the right of the main form. By default, the files already features two boxes titles “Adding an Event” and “Batch Event Add.”

This location is great for longer messaging, such as policies and disclaimers, or for outlined instructions. If you’d like to customize the content of these boxes, just replace or add to the white text you see in the file. Make sure you keep all opening and closing tags intact! You will find the headers on lines 3 and 11 wrapped in an H2 and the content of each box wrapped in <p> tags.

If you’d like to add additional boxes, you can copy lines 10-15 of an unedited file and simply paste them before the final closing div. From there just replace the white copy as before. Both of these approaches are incredibly simple as it keeps the default ID, class and headers so any out of the box or custom styling will also apply to anything new you create. Of course though, if you’d like to start from scratch the sky's the limit.

Above the Form
Now we’re going to hop over to the left side of the page, which is powered by the file titled Public Event Submission Form. Let's start at the top. This location is best suited for the most important information, such as who should be creating events and what kind of event content is appropriate for your platform. If you’d like your new content to be above the submission form box, you’ll be adding a new line directly after line 16 of an unedited file. If you’d like your content to go within the box and right above the fields, you’ll be adding a new line directly after line 21 of an unedited file.

Below the Form
Now let's jump down to the bottom. This location is best suited for letting your audience know what happens after submission, such as how long an event may take to be approved. To add messaging in the gray bar just above the “add event” button, you’ll be adding a new line directly after line 218 of an unedited file.

Within the Form
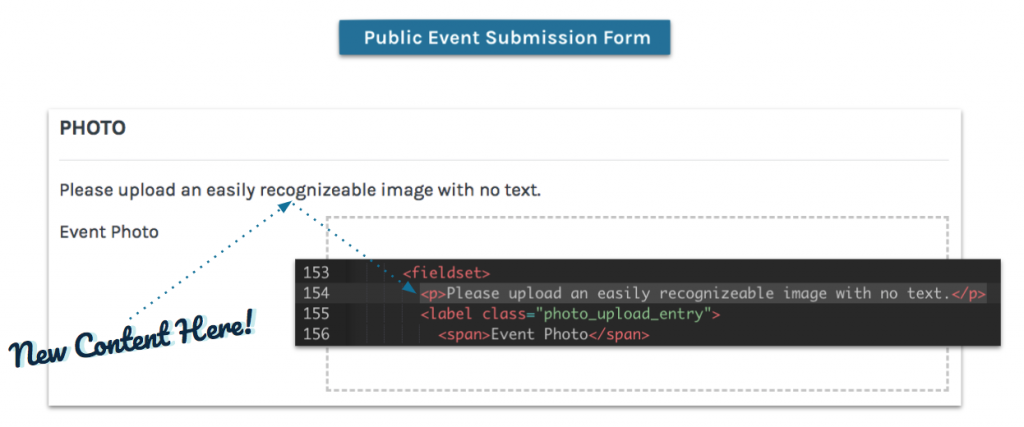
So, what about adding content within the form? When scrolling through the Public Event Submission Form file you’ll see each form section is wrapped in a <fieldset> tag, which starts and ends each section. You’ll be adding a new line directly after the opening <fieldset>. For example, if I want to add a note to the Photo section, I will be adding a new line directly after the opening <fieldset> on line 153 of an unedited file.

BONUS: Text Styling
As you’ve seen in all of these cases, you can just wrap your new text in <p> tags and be set. However, depending on your organization’s branding or the importance of the messaging you’re adding, you probably want to style the new content to pop on the page. Instead of using a regular p tag, you can add a p tag that includes inline styles as seen here. If you’re new to HTML, we highly recommend checking out www.w3schools.com for easy to follow how-to’s and to learn more about other styles you can apply using this method.

That’s all folks! You can read through our Guidelines guide at our Help Center or you can learn more about the Theme Editor. As always, if you have any questions, you can connect directly with the Team by emailing support@concept3d.com. Now go forth and show your audience how to best submit events to your calendar!